The following instructions on this page can only be administered by an Account-Manager of an account.
Alternatively, you can contract us for further individual adjustments. You can read more about this in Section 4 of this page.
Feel free to contact us about further questions.
1. How do I replace the logo atop the download page?
Replacing the logo atop the Download-Page
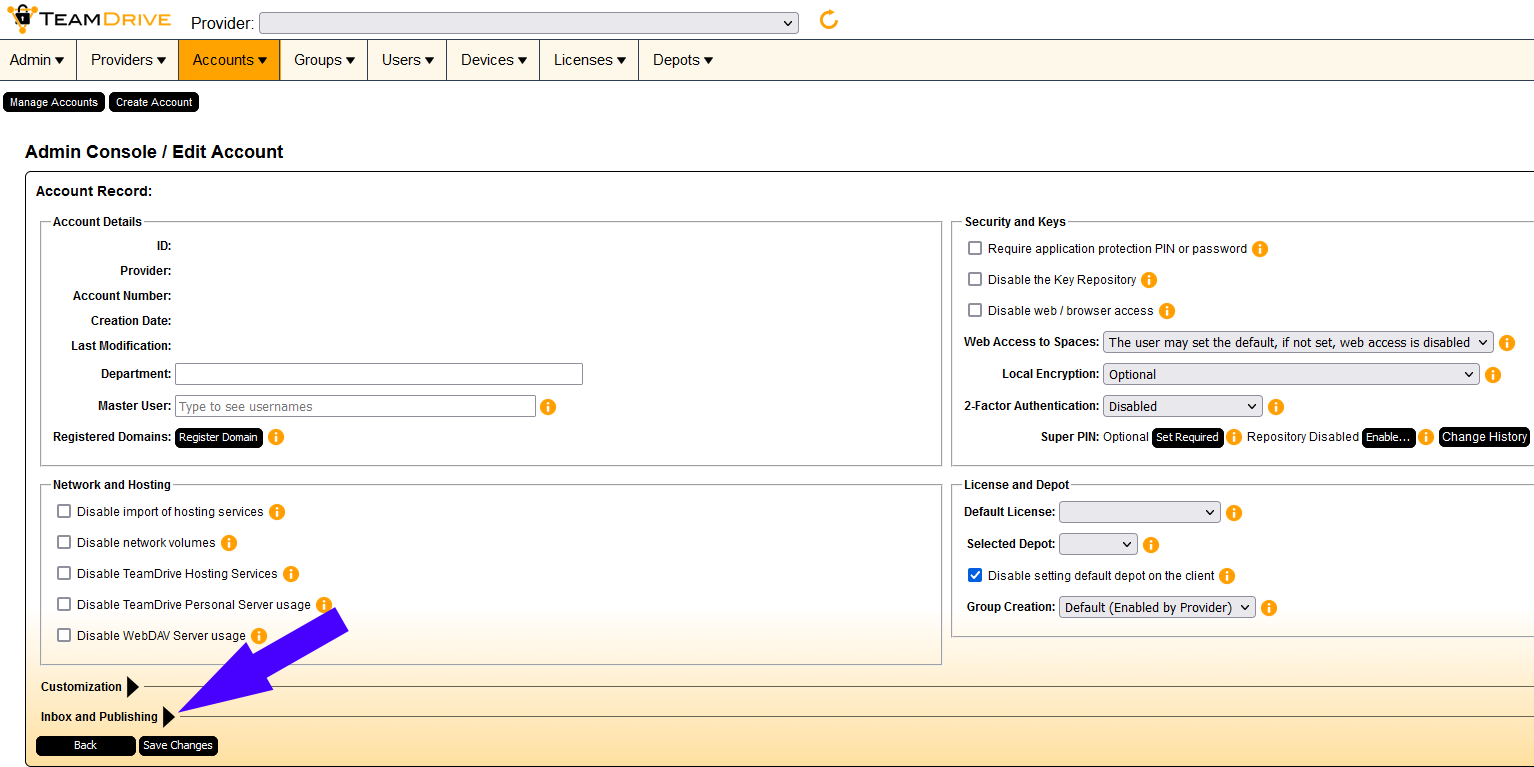
- Login into the Masterconsole
- Navigate to the Admin Panel (of your Account)
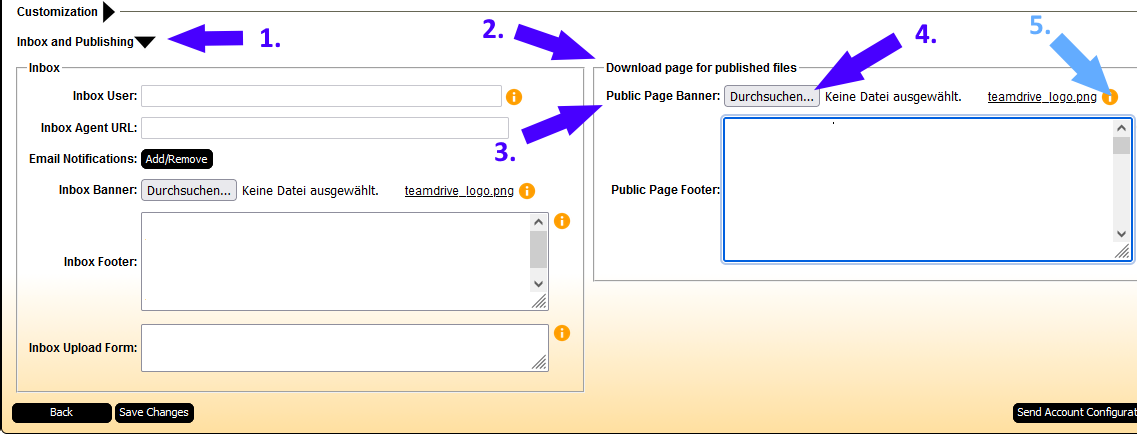
- Arrow 1: “Inbox and Publishing”

- Arrow 2: “Download page for published files”

- Arrow 3: “Public Page Banner”
- Click on “Durchsuchen..” (Arrow 4) to upload a logo of your choice (.jpg or .png)
- Click on “Save Changes” in the bottom left.
You might have to wait up to 15 minutes for changes to take effect.
Returning to the default logo
- Click on the recycle-bin logo (Arrow 5: “Remove Image”)
next to the logos file-name in the Master Console. - Click on “Save Changes” in the bottom left.
2. How do I adjust the size of the logo atop the download page?
To adjust the Logo Size you have to insert the following CSS Code Snippet
- Login into the Masterconsole
- Navigate to the Admin Panel (of your Account)
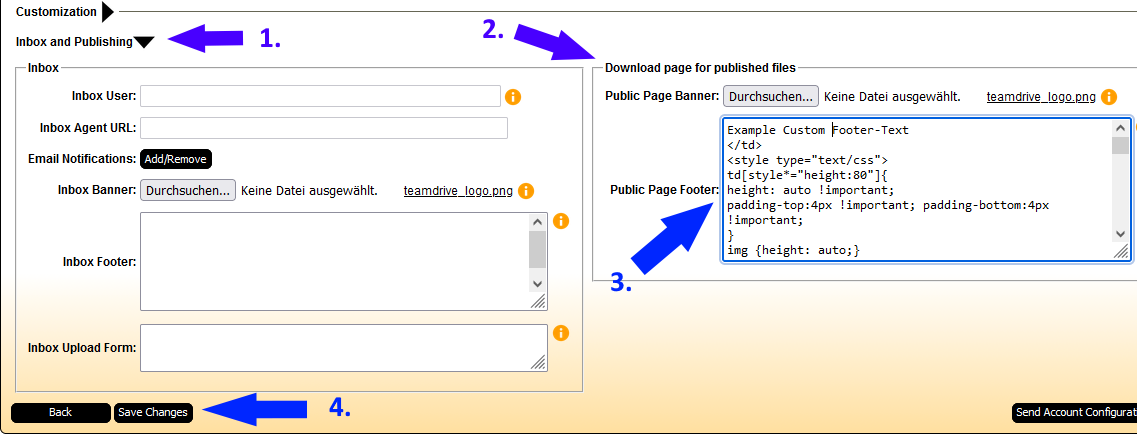
- Arrow 1: “Inbox and Publishing”

- Arrow 2: “Download page for published files”

- Locate the (Arrow 3) “Public Page Footer” text input field
- Paste the following text into it, like you can see on the picture above:
- You can adjust the image size by changing the “auto” in “img {height: auto;}”
into a % or pixel (px) value.

The default Teamdrive-Logo´s dimensions are 244px by 44px.
For Example:img {height: 5%;}or
img {height: 60px;} - Click on “Save Changes”.
You might have to wait up to 15 minutes for changes to take effect.
3. How do I add a Custom Footer Text into the Download-Page?
- Login into the Masterconsole
- Navigate to the Admin Panel (of your Account)
- Arrow 1: “Inbox and Publishing”

- Arrow 2: “Download page for published files”

- Locate the (Arrow 3) “Public Page Footer” text input field”
- Write or paste your desired custom footer text as the very first entry into the input field.
Note: If you add any other text into the field, like for example the Logo-Adjustment-CSS-Code-Snippet, make sure your custom text is placed in front of the< /td> - Click on “Save Changes”.
You might have to wait up to 15 minutes for changes to take effect.
B) [Advanced:] You can wrap your custom footer in a element
For instructions see 3.A)
Wrapping you custom text as an html element allows custom CSS styling and inclusion of links.
For example:
Custom Example Footer
4. [Advanced:] How can I change the appearance of other elements of the Download-Page?
Info: Further customizing the Download-Page requires some skills in CSS.
For a fee of 150€ we can customize the Download-Page and Webportal for you.
You can paste CSS code into the “Public Page Footer” text input field to style html elements of the Download-Page
- Login into the Masterconsole
- Navigate to the Admin Panel (of your Account)
- “Inbox and Publishing”

- Arrow 2: “Download page for published files”

- Arrow 3: “Locate the “Public Page Footer” text input field”
- To adjust colors of the Download-Page you can refrence the DL-Page_Styling_Documentation and remove the comments, or copy an Colorchange CSS Example Snippet
that targets the relevant html elements. You will need you adjust the colors to your liking. - Write or paste your customized CSS code into the input field.
Note: If have a custom footer text make sure your custom footer text is placed in front of the < /td > - Click on “Save Changes”.
You might have to wait up to 15 minutes for changes to take effect.
